.300 Blackout AR-15 Build Guide
By AR-15 Outfitters · April 9, 2026
AR15 Outfitters may earn a commission on purchases made through links in this guide. This does not affect pricing or our recommendations.
Introduction to Building a .300 Blackout AR-15
The .300 Blackout cartridge has revolutionized the AR-15 platform, offering impressive versatility in a familiar package. Originally developed by Advanced Armament Corporation in 2010, this round delivers superior performance for both supersonic and subsonic applications while requiring minimal changes to your standard AR-15 build.
Building your own .300 Blackout AR-15 allows you to customize every component to match your specific needs, whether you’re pursuing home defense, hunting, or range shooting. The cartridge excels in short-barreled configurations, typically producing optimal performance from barrels between 8 and 16 inches. With proper parts selection, you can achieve 2,200 fps with 110-grain supersonic loads or whisper-quiet 1,050 fps with 220-grain subsonic ammunition.
This guide walks you through every step of assembling a reliable .300 Blackout AR-15, from selecting compatible parts to final function testing. We’ll cover the specific considerations that make this caliber unique while ensuring your build operates safely and reliably.
Complete .300 Blackout Parts List
Building a .300 Blackout AR-15 requires careful attention to compatibility. While most components are identical to a standard 5.56 build, several parts are caliber-specific. Here’s everything you’ll need:
Upper Receiver Components
- Upper Receiver: Any mil-spec AR-15 upper receiver – View options on AR15 Outfitters
- .300 Blackout Barrel: 8-16 inch recommended, 1:7 or 1:8 twist rate
- Gas Block: 0.750″ diameter for standard barrels
- Gas Tube: Pistol length for 8-10″ barrels, carbine for 16″
- Handguard: Free-float preferred, length based on barrel choice
- Muzzle Device: 5/8×24 thread pitch for .30 caliber
- Bolt Carrier Group: Standard AR-15/M16 BCG works perfectly
- Charging Handle: Standard AR-15 charging handle
Lower Receiver Components
- Lower Receiver: Any mil-spec AR-15 lower – Configure on AR15 Outfitters
- Lower Parts Kit: Standard AR-15 LPK
- Buffer Tube: Carbine or rifle length
- Buffer: H2 buffer (4.6-4.7 oz) recommended for reliability
- Buffer Spring: Carbine or rifle spring to match buffer tube
- Stock: Your choice based on buffer tube selection
- Pistol Grip: Any AR-15 compatible grip
- Magazine: .300 Blackout specific or modified 5.56 magazines
Essential Tools for Your Build
Proper tools ensure safe assembly and correct torque specifications. While you can complete a basic build with minimal equipment, having the right tools prevents damage and ensures reliability:
| Tool | Purpose | Critical? |
|---|---|---|
| Armorer’s Wrench | Castle nut, barrel nut installation | Yes |
| Vise with AR-15 Blocks | Secure upper/lower during assembly | Yes |
| Torque Wrench (1/2″ drive) | Barrel nut: 30-80 ft-lbs | Yes |
| Inch-Pound Torque Wrench | Scope mounts, gas block screws | Recommended |
| Pin Punches (1/8″, 5/32″) | Installing pins | Yes |
| Allen Key Set | Handguard, grip installation | Yes |
| Headspace Gauges (.300 BLK) | Verify safe chamber dimensions | Recommended |
Step-by-Step Assembly Instructions
Lower Receiver Assembly
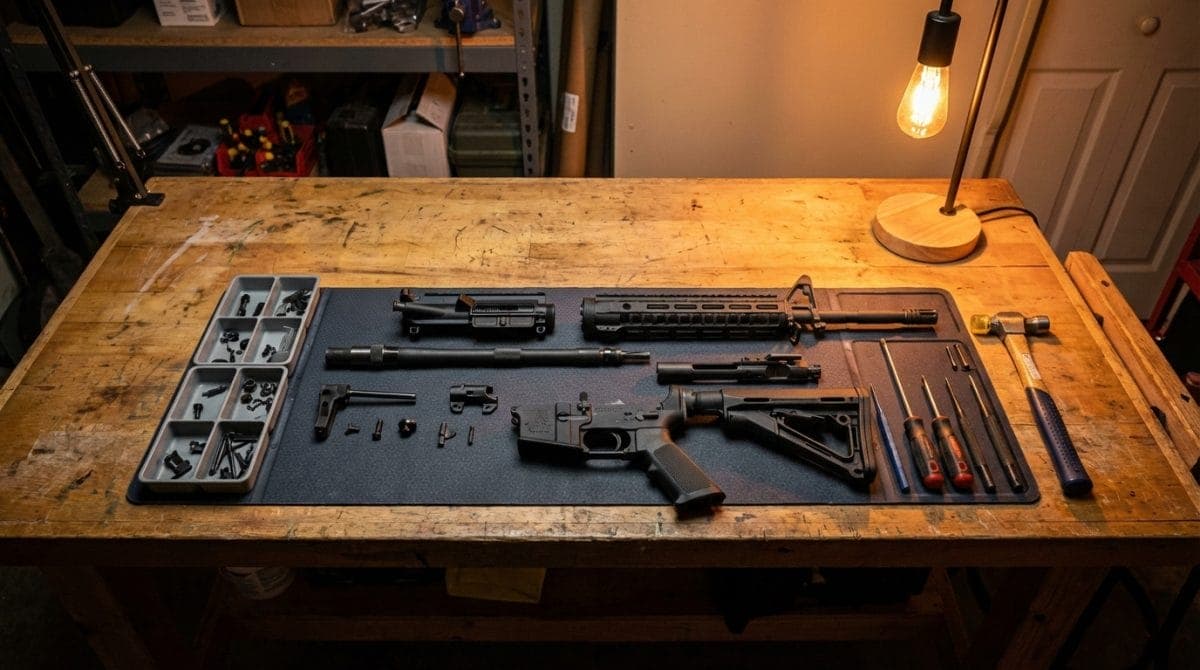
Start with the lower receiver, as it’s generally easier to handle and builds confidence for new builders. Work on a clean, well-lit surface with a mat to prevent losing small parts.
Step 1: Install the Magazine Catch
- Insert the magazine catch through the left side of the receiver
- Thread the magazine catch button from the right side
- Depress the button fully and rotate the catch 8-10 full turns
- Test function: the button should spring back when released
Step 2: Install the Trigger Guard
- Insert the forward pin of the trigger guard into the front hole
- Compress the detent on the rear tab using a 1/8″ punch
- Snap into place (support the receiver ears to prevent cracking)
Step 3: Install the Bolt Catch
- Insert bolt catch spring and detent into the receiver pocket
- Align the bolt catch and insert the roll pin
- Use masking tape on the receiver to prevent marring
- Drive the pin flush using a 3/32″ punch
Step 4: Install the Pivot and Takedown Pins
- Insert detent springs into both holes
- Place detents on top of springs
- Carefully install pins while compressing detents
- The pivot pin installs from left to right
Step 5: Install the Fire Control Group
- Insert the trigger with spring legs forward
- Drive the trigger pin from left to right
- Install hammer with spring legs resting on trigger pin
- Drive hammer pin from left to right
- Install safety selector (requires hammer cocked)
Step 6: Install the Pistol Grip
- Insert safety detent and spring into grip
- Carefully align grip while compressing spring
- Install grip screw (torque to 35-40 inch-pounds)
- Test safety function in both positions
Step 7: Install the Buffer Tube Assembly
- Thread castle nut onto buffer tube (reverse thread)
- Slide end plate over tube
- Insert buffer retainer and spring
- Thread tube into receiver while capturing retainer
- Align tube for stock positioning
- Torque castle nut to 40 ft-lbs
- Stake castle nut in at least two positions
Upper Receiver Assembly
The upper receiver assembly requires more precision, particularly when installing the barrel. Take your time with these steps.
Step 1: Install the Forward Assist
- Insert forward assist spring and pawl
- Compress assembly and insert roll pin
- Drive pin until flush with receiver
Step 2: Install the Ejection Port Cover
- Insert spring with long leg in cover
- Align cover in receiver cuts
- Insert pin through one side
- Capture spring leg and complete pin installation
Step 3: Install the Barrel
- Apply a thin layer of grease to barrel extension
- Insert barrel into upper receiver
- Align barrel pin with receiver slot
- Hand-tighten barrel nut
- Torque to 30 ft-lbs minimum
- Check gas tube hole alignment
- If misaligned, continue tightening up to 80 ft-lbs
- Never loosen to align: only tighten
Step 4: Install the Gas Block and Tube
- Slide gas block over barrel (check 0.750″ diameter)
- Insert gas tube through block and into receiver
- Align gas port in barrel with block
- For set screw blocks: torque to 30 inch-pounds
- For pinned blocks: drill and ream for precise fit
- Secure gas tube with roll pin in block
Step 5: Install the Handguard
Installation varies by type, but free-float rails typically:
- Time the barrel nut for anti-rotation tabs
- Torque barrel nut to manufacturer specification
- Slide handguard over barrel nut
- Secure with provided screws (typically 25-35 inch-pounds)
Step 6: Install the Muzzle Device
- Check threads: .300 Blackout uses 5/8×24
- Install crush washer or shims
- Thread device hand-tight
- Time for proper orientation
- Torque to 15-20 ft-lbs (25-30 ft-lbs for QD mounts)
Step 7: Install BCG and Charging Handle
- Pull charging handle partially back
- Insert into upper receiver
- Slide BCG onto charging handle
- Push both fully forward
- Verify bolt rotates freely
Critical .300 Blackout Considerations
Gas System Tuning
The .300 Blackout cartridge operates at different pressures than 5.56, requiring careful gas system selection. For 8-10 inch barrels, use a pistol-length gas system positioned 4 inches from the chamber. For 16-inch barrels, a carbine-length system at 7 inches typically provides optimal cycling with both supersonic and subsonic ammunition.
An adjustable gas block offers the best versatility, allowing you to tune the system for different loads. Start with the gas block fully open, then gradually restrict flow until the bolt just locks back on an empty magazine. This prevents over-gassing while ensuring reliable function.
Buffer Weight Selection
Buffer weight significantly impacts reliability with .300 Blackout. Most builds perform best with an H2 buffer (4.6-4.7 ounces), though some configurations may require adjustment:
- 8-10″ barrels: H or H2 buffer typically ideal
- 16″ barrels: H2 or H3 for reduced felt recoil
- Suppressed use: Often requires heavier buffer due to increased backpressure
Magazine Compatibility
While .300 Blackout fits in standard 5.56 magazines, feeding reliability varies. Dedicated .300 Blackout magazines feature modified followers and feed geometry optimized for the larger bullet diameter. Magpul PMAGs generally feed reliably without modification, though some aluminum magazines may require follower adjustment for consistent feeding of subsonic rounds.
Common Mistakes to Avoid
Learning from others’ experiences helps ensure a successful first build. These issues appear frequently in .300 Blackout builds:
Wrong Muzzle Device Thread Pitch: The .300 Blackout requires 5/8×24 threads, not the 1/2×28 used for 5.56. Using the wrong thread pitch can cause baffle strikes in suppressors or muzzle device failure.
Incorrect Gas Port Size: Factory barrels typically feature properly sized gas ports, but some budget options may have undersized ports that won’t cycle subsonic ammunition. Verify port diameter matches manufacturer recommendations: typically 0.125″ for 8-10″ barrels.
Mixing Ammunition Types: Never mix .300 Blackout and 5.56 ammunition. The .300 Blackout round can chamber in a 5.56 barrel but will cause catastrophic failure if fired. Use clearly marked magazines and store ammunition separately.
Over-torquing Gas Block Screws: Set screws should be tightened to 30 inch-pounds maximum. Over-torquing can dimple the barrel or strip threads. Apply medium-strength threadlocker for security without excessive torque.
Improper Headspace: While rare with quality components, always verify headspace with GO and NO-GO gauges. The bolt should close on GO (1.361″) but not on NO-GO (1.368″) gauges.
Function Testing Your Build
Before heading to the range, perform these safety checks:
- Headspace Verification: Check with appropriate gauges
- Trigger Function: Verify safety engagement and reset
- Bolt Cycling: Manually cycle to check for binding
- Magazine Fit: Test with multiple magazines
- Gas Block Alignment: Visually verify gas port alignment
Start range testing with single rounds, checking for proper ejection and bolt lock-back. Gradually increase to full magazines, noting any failures to feed or eject. Most issues trace back to gas system tuning or buffer weight selection.
Build This on AR15 Outfitters
Ready to start your .300 Blackout AR-15 build? The AR15 Outfitters Builder simplifies parts selection while ensuring compatibility. Our configurator automatically filters components for your caliber choice, preventing common ordering mistakes.
The builder tool lets you:
- Compare prices across multiple retailers
- Verify parts compatibility in real-time
- Save and share your build configurations
- Track price history for deal alerts
- Access community build guides
Disclaimer: AR15 Outfitters does not sell firearms. This site is an information and affiliate resource only. All purchases are completed through licensed retailers. Always comply with all federal, state, and local laws when building or purchasing firearms and firearm components.