AR-15 Home Defense Build Guide
By AR-15 Outfitters · April 9, 2026
AR15 Outfitters may earn a commission on purchases made through links in this guide. This does not affect pricing or our recommendations.
Building an AR-15 specifically for home defense requires careful consideration of components that balance maneuverability, reliability, and effectiveness in close quarters. This guide walks through selecting parts and assembling a home defense AR-15 that prioritizes quick target acquisition, minimal overpenetration risk, and consistent performance under stress.
Understanding Home Defense Requirements
A home defense AR-15 differs from other builds in several key ways. Typical engagement distances inside homes measure 7 to 15 yards, making a 16-inch barrel more practical than longer options. Weight distribution becomes important when navigating hallways and doorways, while reliability takes precedence over sub-MOA accuracy.
The ideal home defense build typically weighs between 6.5 and 8 pounds unloaded, features a barrel length between 10.5 and 16 inches, and uses ammunition that minimizes wall penetration while maintaining stopping power.
Complete Parts List for Home Defense AR-15
Upper Receiver Components
- Upper Receiver: Forged 7075-T6 aluminum upper receiver
- Barrel: 14.5″ or 16″ chrome-lined 1:7 or 1:8 twist, mid-length gas system
- Gas Block: Low-profile .750″ diameter steel gas block
- Gas Tube: Mid-length stainless steel gas tube
- Handguard: 12-13″ free-float M-LOK or KeyMod rail
- Muzzle Device: Flash suppressor or linear compensator (1/2×28 thread)
- Bolt Carrier Group: M16-profile carpenter 158 steel BCG, properly staked
- Charging Handle: Extended latch ambidextrous charging handle
Lower Receiver Components
- Lower Receiver: Forged 7075-T6 aluminum lower receiver
- Lower Parts Kit: Mil-spec LPK with enhanced trigger guard
- Trigger: Single-stage 4.5-5.5 pound trigger or quality mil-spec
- Buffer System: Carbine buffer tube, H or H2 buffer, carbine spring
- Stock: Adjustable carbine stock with QD attachment points
- Pistol Grip: Ergonomic grip with storage compartment
- Magazine: 30-round PMAG or aluminum USGI magazine
Sighting System
- Primary Optic: Red dot sight with 2-4 MOA dot
- Backup Sights: Folding BUIS (front and rear)
- Light: 500+ lumen weapon light with momentary switch
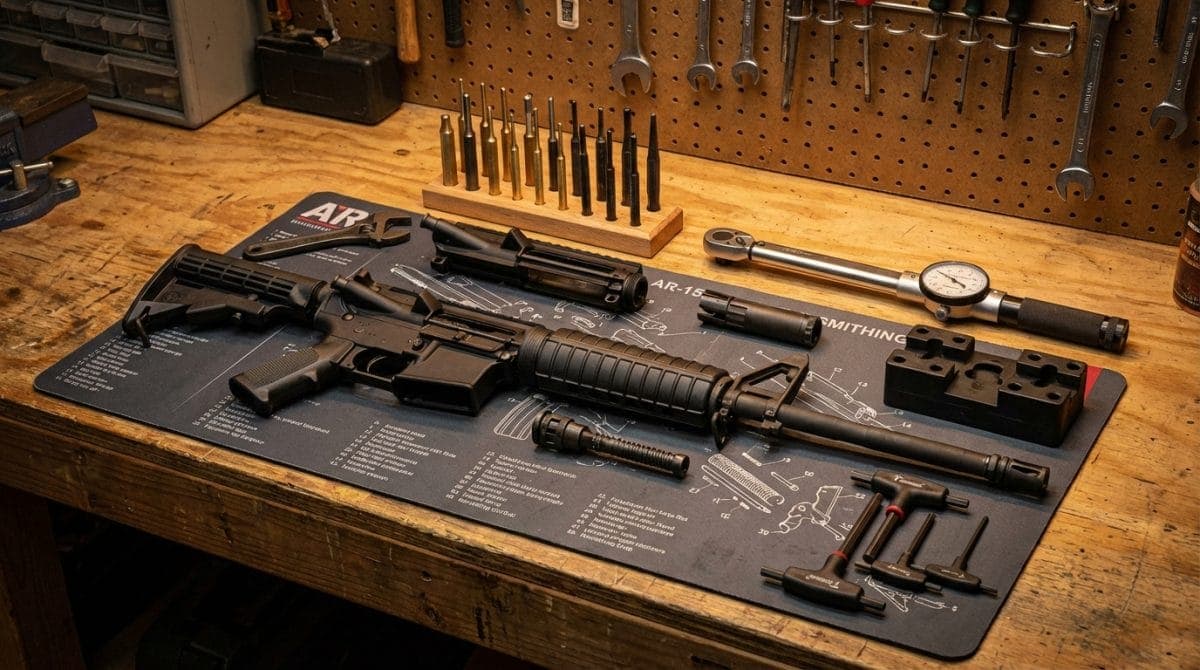
Tools Required for Assembly
Proper tools ensure safe assembly and correct torque specifications:
- AR-15 armorer’s wrench
- Torque wrench (inch-pounds and foot-pounds)
- Upper receiver vise block
- Lower receiver vise block
- Barrel nut wrench (specific to handguard system)
- Roll pin punch set (1/16″, 3/32″, 1/8″, 5/32″)
- Brass or polymer hammer
- Needle-nose pliers
- Blue Loctite 242 (medium strength)
- Aeroshell 33MS or similar grease
- CLP or gun oil
Step-by-Step Assembly Instructions
Upper Receiver Assembly
Step 1: Install Barrel
Apply a thin layer of Aeroshell 33MS grease to the barrel extension and upper receiver threads. Insert the barrel extension into the upper receiver, ensuring the indexing pin aligns with the notch. Hand-tighten the barrel nut, then torque to 30 foot-pounds minimum. Loosen and retighten twice more to properly seat the barrel.
For free-float handguards, torque the barrel nut to manufacturer specifications, typically 35-80 foot-pounds depending on the system. Timing shims may be required to achieve proper alignment.
Step 2: Install Gas System
Slide the gas block over the barrel, aligning the gas port holes. The gas block should sit 0.025-0.035 inches behind the shoulder. Secure with set screws torqued to 30-35 inch-pounds, using blue Loctite. Insert the gas tube through the gas block and into the upper receiver. The gas tube should protrude approximately 0.125 inches into the receiver.
Step 3: Install Handguard
Follow manufacturer instructions for your specific rail system. Most free-float systems require timing the barrel nut, then sliding the handguard over and securing with provided hardware. Torque handguard mounting screws to 15-25 inch-pounds unless otherwise specified.
Step 4: Install Muzzle Device
Thread the muzzle device onto the barrel, using a crush washer or shim kit for proper timing. Torque to 15-20 foot-pounds for most devices. Ensure the device is properly aligned if directional.
Step 5: Install BCG and Charging Handle
Insert the charging handle into the upper receiver slot, sliding it back partially. Insert the bolt carrier group with the bolt in the forward position, ensuring the gas key enters the charging handle groove. Push both fully forward.
Lower Receiver Assembly
Step 1: Install Magazine Catch
Insert the magazine catch into the left side of the receiver. From the right side, place the magazine catch spring over the threaded portion, then thread on the magazine catch button. Depress the button fully and rotate the catch 7-8 full turns. Test for proper function.
Step 2: Install Trigger Guard
Insert the forward pin of the trigger guard into the front hole. Compress the rear tab and align with the rear hole. Drive the roll pin through using a 1/8″ punch. Support the receiver ears to prevent cracking.
Step 3: Install Pivot and Takedown Pins
Install the pivot pin detent and spring into the front hole. Compress with a 1/4″ clevis pin or specialized tool. Insert the pivot pin from the left side. Repeat for the takedown pin in the rear, using the buffer tube to capture the spring and detent.
Step 4: Install Trigger Group
Insert the trigger into the receiver, aligning the pin holes. Drive the trigger pin from left to right. Install the disconnector spring (small end down) on the trigger. Place the disconnector on top, then install the hammer with hammer spring legs resting on the trigger pin. Drive the hammer pin from left to right.
Step 5: Install Safety Selector
With the hammer cocked, insert the safety selector from the left side. Install the detent and spring from the pistol grip hole. The detent should ride in the safety selector groove.
Step 6: Install Buffer Tube Assembly
Apply a small amount of grease to the buffer tube threads. Thread the buffer tube into the receiver, aligning the drainage hole at the 6 o’clock position. The tube should be threaded in 6-7 full turns. Torque the castle nut to 38-42 foot-pounds. Stake the castle nut in at least two places.
Step 7: Install Stock and Pistol Grip
Slide the stock onto the buffer tube. Install the pistol grip using the provided screw and lock washer, ensuring the safety detent spring remains in place. Torque grip screw to 25-35 inch-pounds.
Final Assembly
Connect the upper and lower receivers using the pivot and takedown pins. Insert the buffer and buffer spring into the buffer tube. Function check all controls: safety selector should move freely between positions, trigger should reset properly, and the bolt should lock back on an empty magazine.
Common Mistakes to Avoid
Over-torquing Gas Block Set Screws
Excessive torque can dimple the barrel or strip threads. Stay within 30-35 inch-pounds and use thread locker.
Incorrect Gas Tube Alignment
The gas tube must align perfectly with the gas key. Misalignment causes cycling issues and accelerated wear. Check alignment by slowly closing the bolt; you should feel no resistance.
Mixing Buffer Weights
For a 16-inch mid-length gas system, a standard carbine buffer typically works well. Shorter barrels or suppressed use may require an H or H2 buffer. Test with different ammunition types to ensure reliable cycling.
Improper Staking
Both the gas key and castle nut require proper staking. Use a center punch to create clear indentations that prevent loosening under recoil.
Wrong Spring Orientation
The disconnector spring installs with the small end down. The hammer spring legs rest on top of the trigger pin, providing proper tension.
Ammunition Selection for Home Defense
Home defense ammunition should balance stopping power with limited penetration. Popular choices include:
| Ammunition Type | Bullet Weight | Typical Velocity | Penetration Characteristics |
|---|---|---|---|
| Hornady TAP Urban | 55-75gr | 2,700-3,000 fps | Limited barrier penetration |
| Federal Fusion MSR | 62gr | 2,750 fps | Moderate expansion, controlled penetration |
| Speer Gold Dot | 55-75gr | 2,700-2,900 fps | Consistent expansion through barriers |
Test your chosen ammunition for reliability and point of impact. Most home defense scenarios occur at distances where a 50-yard zero provides adequate accuracy.
Optic and Light Setup
A quality red dot sight offers the fastest target acquisition for home defense. Popular options include the Aimpoint PRO, Trijicon MRO, or Holosun 510C. Mount the optic at a height providing comfortable cheek weld and co-witness with backup sights.
Weapon lights should produce minimum 500 lumens with a focused beam and spill. Mount the light at 12 or 3 o’clock position, keeping controls accessible. Pressure switches should be positioned for natural thumb activation without altering grip.
Build This on AR15 Outfitters
Ready to start your home defense AR-15 build? Visit AR15 Outfitters’ build configurator to select compatible parts and compare prices across multiple retailers. The builder ensures part compatibility while showing real-time pricing from trusted vendors.
Start with a quality lower receiver and build up from there. The configurator guides you through each component selection, preventing compatibility issues common with first-time builds. Add parts to your build list, compare total prices, and purchase from your preferred retailers.
For those preferring complete upper assemblies, search pre-configured uppers that match your home defense requirements. Pairing a complete upper with your custom lower often provides the best balance of customization and simplicity.
Remember to factor in magazines, slings, and ammunition when budgeting your build. A properly configured home defense AR-15 typically costs between $800 and $1,500 depending on component selection, not including optics and accessories.
Disclaimer: AR15 Outfitters does not sell firearms. This site is an information and affiliate resource only. All purchases are completed through licensed retailers. Always comply with all federal, state, and local laws when building or purchasing firearms and firearm components.