First AR-15 Build: Complete Beginner’s Guide
By AR-15 Outfitters · April 9, 2026
AR15 Outfitters may earn a commission on purchases made through links in this guide. This does not affect pricing or our recommendations.
Building your first AR-15 can feel overwhelming, but with the right guidance and tools, it becomes an enjoyable and rewarding experience. This comprehensive guide breaks down everything you need to know for your first AR-15 build, from understanding basic components to completing your rifle.
What Is an AR-15?
The AR-15 is a lightweight, semi-automatic rifle platform originally designed by ArmaLite in the 1950s. Despite common misconceptions, “AR” stands for ArmaLite Rifle, not “assault rifle.” Today’s AR-15s are civilian sporting rifles used for target shooting, hunting, home defense, and competition.
What makes the AR-15 special for builders is its modular design. Unlike traditional rifles, you can easily swap parts, customize configurations, and build exactly what you want. Think of it like adult LEGOs, but with precise engineering tolerances and specific compatibility requirements.
Understanding the Upper and Lower Receivers
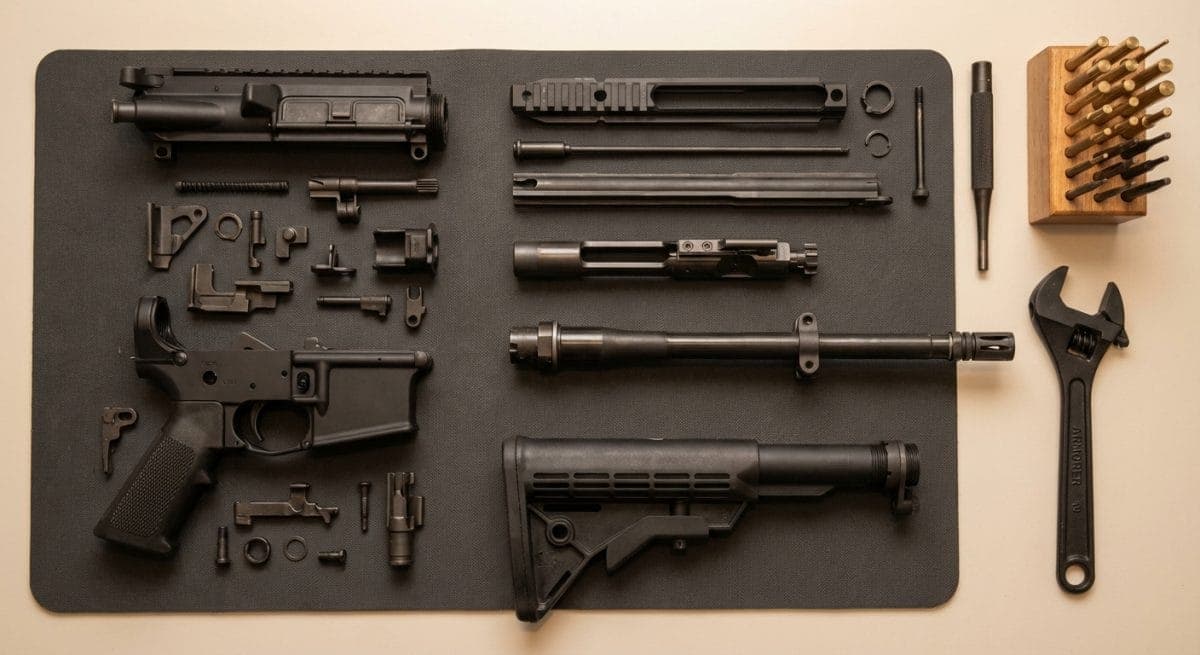
Every AR-15 consists of two main sections that separate with two pins:
The Lower Receiver: This is the serialized part that legally constitutes the firearm. It houses the trigger group, magazine well, and buffer system. When you buy a lower receiver, you’re technically buying a firearm and must go through an FFL (Federal Firearms License) dealer with a background check.
The Upper Receiver: This contains the barrel, bolt carrier group, charging handle, and handguard. Upper receivers and their components can typically be shipped directly to your door since they’re not considered firearms by themselves.
The beauty of this system is that one lower receiver can host multiple upper receivers, letting you switch between different calibers or configurations in seconds.
Essential AR-15 Parts Explained
Lower Receiver Components
Lower Receiver: The foundation of your build. Available in forged (stronger, more affordable) or billet (custom machined, aesthetic) options. Standard mil-spec dimensions ensure compatibility with most parts.
Lower Parts Kit (LPK): Contains approximately 31 small parts including pins, springs, and detents needed to complete your lower. A typical LPK includes the safety selector, bolt catch, magazine release, and trigger guard.
Trigger Group: The fire control mechanism. Basic mil-spec triggers typically break at 5.5 to 8.5 pounds, while upgraded triggers can go as low as 2.5 pounds for precision shooting.
Buffer Tube: The aluminum tube extending from the rear of the lower. Rifle-length tubes are fixed, while carbine tubes have six positions for adjustable stocks. Ensure you match the tube type to your intended stock.
Buffer and Spring: Work together to manage recoil and cycle the action. Standard carbine buffers weigh 3.0 ounces, while H, H2, and H3 buffers add weight for tuning reliability.
Stock: Your shoulder interface. Fixed stocks mount to rifle tubes, adjustable stocks to carbine tubes. Consider your length of pull (typically 13 to 14 inches for most adults).
Pistol Grip: Most use the standard A2 angle, though vertical and reduced-angle options exist for different shooting preferences.
Upper Receiver Components
Upper Receiver: Houses all the moving parts of the action. Forged uppers dominate the market due to their strength and value.
Barrel: Determines accuracy, velocity, and legal classification. Common lengths include 16 inches (carbine), 18 inches (SPR), and 20 inches (rifle). Barrels under 16 inches require NFA registration.
Gas Block: Directs gas from the barrel to cycle the action. Low-profile blocks fit under handguards, while front sight blocks serve dual purposes. Ensure the gas block journal diameter matches your barrel (typically 0.750 inches for most profiles).
Gas Tube: Connects the gas block to the upper receiver. Length must match your gas system: carbine (7 inches), mid-length (9 inches), or rifle (12 inches).
Bolt Carrier Group (BCG): The heart of the AR-15’s operation. Contains the bolt, carrier, cam pin, firing pin, and gas key. Most builders choose complete BCGs tested for proper headspace.
Charging Handle: Used to manually cycle the action. Standard handles work fine, though ambidextrous and extended latches improve manipulation.
Handguard: Protects your hands from the hot barrel while providing mounting points for accessories. Free-float designs don’t contact the barrel, improving accuracy potential.
Muzzle Device: Controls what happens when the bullet exits. Flash hiders reduce visible signature, brakes reduce recoil, and compensators reduce muzzle rise. Thread pitch must match your barrel (typically 1/2×28 for .223/5.56).
Legal Considerations for First-Time Builders
Before starting your first AR-15 build, understand these legal requirements:
Federal Laws: The lower receiver is the serialized firearm. You must be 21 to purchase from an FFL dealer, pass a background check, and comply with all federal regulations. Building a rifle with a barrel under 16 inches or overall length under 26 inches creates an NFA item requiring special registration and a $200 tax stamp.
State Laws: Regulations vary significantly. California, New York, New Jersey, Connecticut, Maryland, and Massachusetts have specific feature restrictions. Some states ban certain magazine capacities, require fixed magazines, or prohibit specific features like pistol grips or adjustable stocks. Research your local laws thoroughly before ordering parts.
80% Lowers: These partially completed receivers require additional machining to function. While federally legal for personal use, some states have banned or restricted them. Never build with intent to sell without proper licensing.
Tools Required for Assembly
A proper tool set prevents damage and ensures correct assembly:
Essential Tools:
- Armorer’s wrench (for castle nut and barrel nut): $25-50
- Punch set with brass and steel punches: $15-30
- Hammer with brass and nylon faces: $15-25
- Hex keys/Allen wrenches (1/8″, 3/16″, 1/4″): $10-20
- Torque wrench (inch-pounds for scope mounts): $40-80
- Vise with soft jaws or receiver blocks: $50-150
Helpful Additions:
- Roll pin starter punches: $15-25
- Pivot pin installation tool: $10-20
- Reaction rod or upper receiver vise block: $40-80
- Dental picks for spring and detent installation: $5-10
- Blue Loctite for screws: $5-10
Typically budget $150 to 300 for quality tools that will last through multiple builds.
Setting Up Your Workspace
A well-organized workspace makes building easier and prevents lost parts:
Work Surface: Use a clean, flat bench or table with good lighting. A rubber mat or old towel prevents scratches and catches dropped parts. Magnetic parts trays help organize small components.
Organization: Sort parts by sub-assembly before starting. Use labeled containers or bags for different part groups. Keep your lower parts kit organized; those tiny detents and springs love to fly across the room.
Reference Materials: Have assembly guides, parts diagrams, and your computer nearby for reference. Many manufacturers include QR codes linking to installation videos.
Safety Prep: Wear safety glasses when driving pins or working with springs under tension. Ensure your workspace is free from ammunition and establish a clear policy: no live ammo in the build area.
Budget Breakdown for Your First Build
Understanding costs helps you plan your first AR-15 build effectively. Here’s a typical breakdown for a quality, basic build:
Budget Build ($500-700):
- Lower receiver: $50-80
- Lower parts kit with basic trigger: $40-60
- Buffer tube kit: $25-40
- Stock: $20-50
- Upper receiver: $50-80
- Barrel: $100-150
- Bolt carrier group: $70-100
- Charging handle: $15-25
- Handguard: $50-100
- Gas block and tube: $25-40
- Muzzle device: $15-30
Mid-Range Build ($800-1,200):
Upgrades typically include a better trigger ($100-150), free-float handguard ($100-200), and higher-quality barrel ($200-300).
High-End Build ($1,500+):
Premium components like match-grade barrels ($400+), two-stage triggers ($200+), and advanced BCGs ($200+) push costs higher but deliver exceptional performance.
Remember to budget for magazines ($10-15 each), optics or sights ($100-500+), sling ($20-50), and ammunition for testing and training.
Recommended Build Order
Following this sequence minimizes complications during your first AR-15 build:
Phase 1: Lower Receiver Assembly
- Install Magazine Release: Start here because it’s straightforward and builds confidence. Insert from the left, thread button from right, depress fully while tightening.
- Install Bolt Catch: Slightly more complex with a roll pin, but still manageable. Use a punch that matches the pin diameter.
- Install Pivot and Takedown Pins: These use detents and springs. Work over a towel to catch flying parts. Install one at a time.
- Install Trigger Guard: Simple roll pin installation. Some receivers have integrated guards, eliminating this step.
- Install Safety Selector: Requires the trigger be installed first for proper function testing.
- Install Trigger Group: Follow manufacturer’s specific instructions, as designs vary. Verify safety function before proceeding.
- Install Pistol Grip: Contains the safety detent and spring. Install carefully to avoid launching the spring.
- Install Buffer Tube Assembly: Apply proper torque (38-42 ft-lbs) to castle nut and stake for security.
Phase 2: Upper Receiver Assembly
- Install Barrel: Align gas port with gas block journal. Torque barrel nut to manufacturer’s specification (typically 30-80 ft-lbs).
- Install Gas Block and Tube: Ensure proper alignment for reliable cycling. Dimpled barrels provide positive location.
- Install Handguard: Method varies by design. Free-float rails typically require specific barrel nut torque.
- Install Muzzle Device: Use appropriate shims or crush washers for timing. Torque to 15-20 ft-lbs typically.
- Install Charging Handle and BCG: Simple drop-in installation. Verify bolt moves freely.
Phase 3: Final Assembly and Function Check
- Join upper and lower receivers with takedown pins
- Perform safety check: selector function, trigger reset, bolt lock on empty magazine
- Cycle action manually to verify smooth operation
- Install optics or sights with proper torque (typically 15-25 in-lbs)
Common Beginner Mistakes to Avoid
Learning from others’ experiences saves time and prevents damage:
Gas System Length Mismatches: Your gas tube length must match your barrel’s gas system. A mid-length barrel requires a mid-length tube, not carbine length.
Buffer System Compatibility: Rifle buffers won’t fit in carbine tubes. Match your buffer, spring, and tube as a system.
Over-Torquing: More isn’t better. Follow specified torque values to prevent stripping threads or crushing components.
Backward Gas Tube: The gas tube has a specific orientation. The end with the larger opening goes into the gas key.
Missing Gas Block Alignment: Misaligned gas blocks cause failures to cycle. Verify gas port alignment before final tightening.
Using the AR15 Outfitters Builder
The AR15 Outfitters Builder eliminates compatibility guesswork for your first AR-15 build. This free tool functions like PCPartPicker for AR-15s, automatically checking part compatibility and finding the best prices.
Key Features for Beginners:
- Compatibility checking prevents ordering mismatched parts
- Price comparison across multiple retailers saves money
- Build lists can be saved and shared for feedback
- Running total helps track budget in real-time
- Filter options narrow choices to your preferences
Start by selecting your lower receiver, then work through each category. The builder flags incompatibilities, such as carbine stocks with rifle buffer tubes or incorrect gas tube lengths.
Recommended Parts
For your first AR-15 build, consider these reliable options available through the AR15 Outfitters Builder:
Lower Components: Start with a forged lower receiver from established manufacturers like Aero Precision, Anderson, or PSA. These typically cost $50-80 and provide excellent value. Pair with a basic lower parts kit and mil-spec trigger for your first build, upgrading later as you learn your preferences.
Upper Components: A 16-inch barrel with mid-length gas system offers versatility and soft recoil. Chrome-lined or nitride-treated bores provide longevity. Choose a free-float handguard for accuracy potential and accessory mounting.
Critical Components: Don’t skimp on your bolt carrier group or barrel. These parts significantly impact reliability and accuracy. A properly tested BCG runs $70-150, while quality barrels start around $150.
Use the AR15 Outfitters Builder to explore options within your budget. The compatibility checker ensures all selected parts work together, eliminating expensive mistakes. Start with the lower receiver category and work through each component systematically.
Remember, building your first AR-15 is a learning experience. Take your time, double-check compatibility, and don’t hesitate to ask questions in forums or communities. The skills you develop will serve you through many future builds and modifications.
Disclaimer: AR15 Outfitters does not sell firearms. This site is an information and affiliate resource only. All purchases are completed through licensed retailers. Always comply with all federal, state, and local laws when building or purchasing firearms and firearm components.