How to Build an AR-15 Upper Receiver: Complete Guide
By AR-15 Outfitters · April 9, 2026
AR15 Outfitters may earn a commission on purchases made through links in this guide. This does not affect pricing or our recommendations.
Building an AR-15 upper receiver is one of the most rewarding aspects of assembling your own rifle. While it requires more specialized tools and technical knowledge than assembling a lower receiver, the process becomes straightforward once you understand the fundamentals. This guide will walk you through every step of how to build AR-15 upper receiver assemblies, from selecting compatible parts to final assembly.
Understanding Upper Receiver Components
Before diving into the build process, you need to understand what parts make up a complete AR-15 upper receiver assembly. Each component plays a specific role in the function and performance of your rifle.
Core Components Required
A complete upper receiver build requires these essential parts:
- Stripped Upper Receiver: The aluminum housing that contains all other components. Available in forged (typically 7075-T6 aluminum) or billet configurations.
- Barrel: The heart of accuracy and performance. Common lengths include 10.5″, 11.5″, 14.5″, 16″, 18″, and 20″.
- Gas Block: Directs gas from the barrel port to the gas tube. Available in low-profile, adjustable, and front sight base configurations.
- Gas Tube: Carries gas from the gas block to the bolt carrier group. Length depends on your gas system (pistol, carbine, mid-length, or rifle).
- Handguard: Protects your hand from barrel heat and provides mounting points for accessories. Free-float designs typically offer better accuracy potential.
- Muzzle Device: Controls muzzle rise, flash signature, or sound signature. Must match your barrel thread pitch (typically 1/2×28 for .223/5.56).
- Barrel Nut: Secures the barrel to the upper receiver. Design varies based on handguard system.
- Forward Assist: Allows manual closure of the bolt if needed. Standard mil-spec diameter is 0.315″.
- Dust Cover: Protects the action from debris when closed. Includes dust cover, rod, and C-clip.
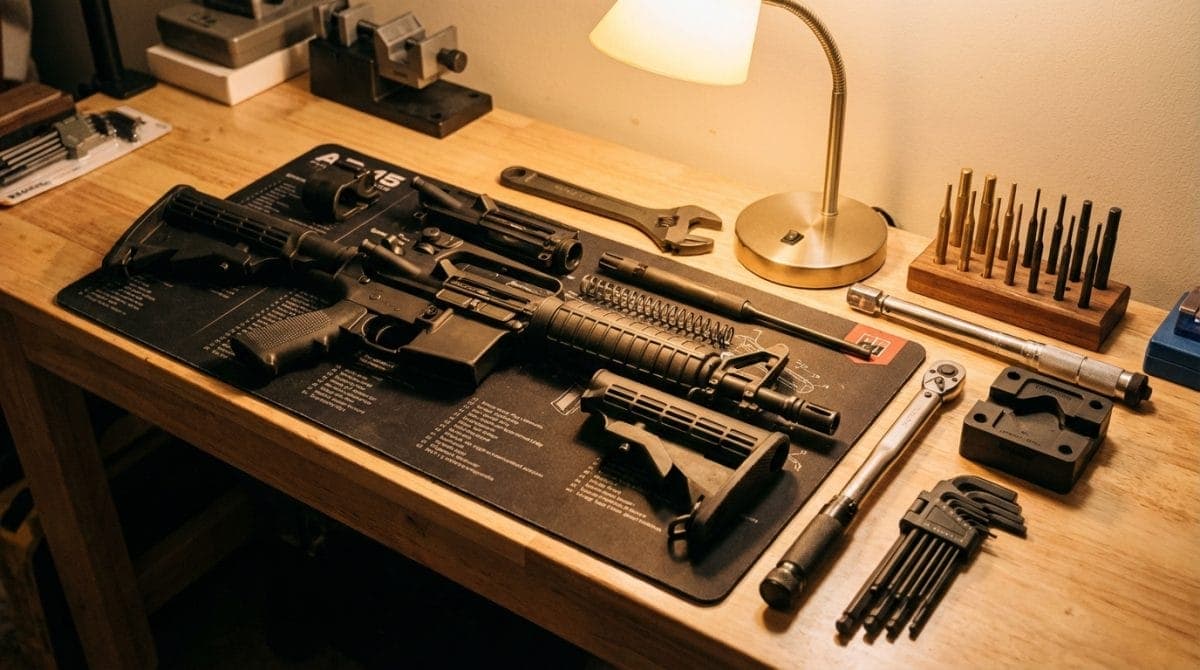
Essential Tools for Upper Assembly
Proper tools make the difference between a professional build and potential damage to expensive parts. While you can improvise some tools, investing in quality equipment pays dividends across multiple builds.
Required Tools
- Upper Receiver Vise Block: Securely holds your upper without marring the finish. Reaction rod systems that interface with the barrel extension offer superior support.
- Torque Wrench: Essential for proper barrel nut installation. You’ll need one capable of 30-80 ft-lbs minimum.
- Armorer’s Wrench: Multi-tool designed for AR-15 assembly, including barrel nut installation and muzzle device removal.
- Punch Set: For installing gas tube roll pin. 3/32″ and 5/32″ are most commonly used sizes.
- Hammer: Brass or nylon-faced to avoid marring parts.
- Thread Locker: Medium-strength (blue) for muzzle devices.
- Aeroshell 33MS or Similar Grease: For barrel nut threads and barrel extension.
Helpful Additional Tools
- Barrel Nut Alignment Tool: Helps achieve proper gas tube alignment.
- Go/No-Go Headspace Gauges: For verifying safe headspace (especially important with new barrels).
- Gas Block Alignment Jig: Ensures perfect gas port alignment.
Pre-Assembly Preparation
Before starting assembly, verify part compatibility and prepare your workspace. A clean, well-lit area with a padded surface prevents damage to parts and lost components.
Checking Part Compatibility
Confirm these compatibility factors before beginning:
- Barrel Extension to Upper Receiver Fit: The barrel extension should slide into the upper receiver with minimal play. Typical clearance is 0.001-0.003″.
- Gas System Length: Match your gas tube length to your barrel’s gas system. For example, a mid-length system on a 16″ barrel requires a mid-length gas tube.
- Handguard Compatibility: Ensure your handguard’s barrel nut works with your upper receiver’s threading (standard is 1.350″-16 TPI).
- Muzzle Device Thread Pitch: Most 5.56/.223 barrels use 1/2×28 threads, while .308 typically uses 5/8×24.
Step-by-Step Assembly Process
With parts verified and tools ready, you can begin the assembly process. Take your time, especially during barrel installation, as this step significantly impacts accuracy and safety.
Installing the Barrel
The barrel installation sets the foundation for your entire upper build. Proper technique here ensures safety and optimal performance.
- Prepare the Upper Receiver: Clean the receiver threads and barrel extension seat with degreaser. Apply a thin layer of grease to the receiver threads and barrel extension.
- Insert the Barrel: Align the barrel extension pin with the notch in the upper receiver threads. The barrel should slide in smoothly without force.
- Install the Barrel Nut: Thread the barrel nut hand-tight, then back it off. This helps distribute grease evenly.
- Initial Torque: Using your torque wrench, tighten to 30 ft-lbs minimum. Most manufacturers recommend 30-80 ft-lbs, with 35-50 ft-lbs being typical.
- Align Gas Tube Hole: If your barrel nut doesn’t align with the gas tube hole at proper torque, continue tightening up to 80 ft-lbs maximum. Never loosen to align.
Verifying Headspace
Headspace verification ensures safe operation. While quality barrels and bolts rarely have issues, checking provides peace of mind.
- Insert Go Gauge: Place the go gauge in the chamber. A stripped bolt (no extractor or ejector) should close completely on the gauge.
- Check No-Go Gauge: The bolt should not close on a no-go gauge. If it does, do not use this barrel/bolt combination.
- Field Gauge (Optional): This represents maximum acceptable headspace. The bolt should never close on a field gauge.
Installing the Gas Block and Tube
Proper gas system alignment is essential for reliable function. Misalignment causes short-stroking, failure to cycle, or excessive wear.
- Locate Gas Port: Measure from the shoulder of the barrel extension to the gas port. Common distances include 7″ for carbine, 9″ for mid-length, and 12″ for rifle-length systems.
- Install Gas Tube in Block: Insert the gas tube into the gas block, ensuring the roll pin hole aligns. The tube’s bends should orient correctly (typically bend toward the barrel).
- Pin the Gas Tube: Drive the roll pin through the gas block and tube. Support the opposite side to prevent bending.
- Position on Barrel: Slide the gas block onto the barrel, aligning the gas port in the block with the port in the barrel. For low-profile blocks, typical spacing from the shoulder is 0.025-0.050″ less than your measurement.
- Secure Gas Block: Tighten set screws to 25-30 inch-pounds, or follow manufacturer specifications. Some prefer to dimple the barrel for positive retention.
Handguard Installation
Handguard installation varies significantly between systems. Free-float designs generally follow this pattern:
- Install Barrel Nut (if separate): Some handguards use proprietary barrel nuts. Follow manufacturer torque specifications.
- Time the Handguard: If your handguard uses a timing shim system, install appropriate shims to achieve proper orientation.
- Slide Handguard Over Barrel Nut: Align any anti-rotation tabs or indexing features.
- Secure Handguard: Tighten mounting screws to manufacturer specifications, typically 15-25 inch-pounds for aluminum handguards.
Forward Assist and Dust Cover Assembly
These mil-spec features complete the upper receiver assembly:
Forward Assist Installation:
- Insert the forward assist spring into the upper receiver bore.
- Compress the forward assist pawl into the body.
- Thread the forward assist into the receiver (typically 20-25 ft-lbs).
- Verify smooth operation and proper spring return.
Dust Cover Installation:
- Insert the dust cover rod through one side of the receiver.
- Position the dust cover with spring tension toward the barrel.
- Complete rod insertion and install the C-clip.
- Test spring tension and smooth operation.
Muzzle Device Installation
The final step requires attention to timing (for brakes and compensators) and proper torque:
- Check Thread Condition: Clean threads and verify no damage exists.
- Install Crush Washer or Shims: Most muzzle devices use crush washers for timing. Install with the tapered side facing the device.
- Apply Thread Locker: Use medium-strength thread locker on the first few threads.
- Time the Device: For brakes and compensators, ports should orient vertically. Tighten to achieve proper timing while reaching adequate torque (typically 15-20 ft-lbs).
- Verify Bore Alignment: Visually confirm the bore is centered in the muzzle device opening.
Gas System Tuning and Testing
After assembly, verify proper gas system function before heading to the range:
Gas System Alignment Check
Poor gas alignment causes reliability issues and accelerated wear. To verify alignment:
- Remove the handguard if it obstructs view.
- Insert the gas tube fully into the upper receiver.
- The tube should enter the gas key smoothly without binding.
- Check for equal spacing around the gas tube where it enters the receiver.
Function Testing
Before live fire testing, perform these checks:
- Charging Handle Operation: Should cycle smoothly without binding.
- Bolt Carrier Movement: With upper and lower assembled, the BCG should move freely through its full range.
- Gas Tube Clearance: Verify the gas tube doesn’t contact the upper receiver or handguard during BCG movement.
Common Build Issues and Solutions
Even experienced builders encounter challenges. Here are solutions to frequent problems:
Barrel Nut Won’t Align
If you reach 80 ft-lbs without achieving gas tube alignment:
- Try a different brand of barrel nut (variations in manufacturing tolerances exist).
- Use precision shims between the barrel extension and upper receiver (0.001-0.003″ maximum).
- Consider barrel nuts with more alignment positions.
Gas Block Won’t Stay Aligned
For persistent gas block movement:
- Dimple the barrel at set screw locations (requires drill press and proper jig).
- Use high-temperature thread locker on set screws.
- Consider a clamp-on or pinned gas block for bombproof retention.
Handguard Rotation
If your free-float handguard rotates:
- Verify proper torque on mounting hardware.
- Check for missing anti-rotation features.
- Add thread locker to mounting screws (after verifying alignment).
Recommended Parts
Building a quality AR-15 upper starts with selecting compatible, reliable components. The AR15 Outfitters Builder makes this process simple by showing real-time compatibility and pricing across multiple vendors.
Upper Receivers
When selecting upper receivers through the AR15 Outfitters Builder, consider forged receivers for durability and value, or billet receivers for enhanced features and aesthetics. Look for receivers with M4 feed ramps for reliable feeding with various ammunition types.
Barrels
The barrel selection tool on AR15 Outfitters Builder allows filtering by length, profile, and gas system. For general use, a 16″ mid-length gas system provides excellent dwell time (approximately 7.1″) and soft recoil impulse. Chrome-lined or nitrided barrels offer superior corrosion resistance for hard-use applications.
Handguards
Free-float handguards available through the AR15 Outfitters Builder improve accuracy potential by eliminating barrel contact. M-LOK attachment systems dominate the market, offering lighter weight than quad rails while maintaining versatility. Match handguard length to your gas system for optimal aesthetics and function.
Gas Blocks
The AR15 Outfitters Builder categorizes gas blocks by height and attachment method. Low-profile gas blocks (.750″ for most barrels) fit under free-float handguards. Adjustable gas blocks allow tuning for suppressed use or specific ammunition, though they add complexity.
Muzzle Devices
Browse muzzle devices on the AR15 Outfitters Builder based on your priorities: flash hiders for signature reduction, brakes for recoil mitigation, or compensators for muzzle rise control. Combination devices offer compromise performance across multiple attributes.
The AR15 Outfitters Builder streamlines parts selection by showing only compatible options as you build, preventing costly mistakes and ensuring all components work together properly. Use the compatibility checker to verify your complete upper build before purchasing.
Disclaimer: AR15 Outfitters does not sell firearms. This site is an information and affiliate resource only. All purchases are completed through licensed retailers. Always comply with all federal, state, and local laws when building or purchasing firearms and firearm components.