How to Install an AR-15 Free Float Handguard
By AR-15 Outfitters · April 10, 2026
AR15 Outfitters may earn a commission on purchases made through links in this guide. This does not affect pricing or our recommendations.
Installing a free float handguard on your AR-15 transforms both accuracy and modularity. Unlike standard handguards that contact the barrel through the front sight post or delta ring assembly, free float designs attach solely to the upper receiver. This eliminates pressure points that can shift your point of impact as the barrel heats up during shooting sessions.
Why Install a Free Float Handguard?
Free float handguards offer measurable accuracy improvements, typically reducing group sizes by 0.5 to 1.5 MOA in most cases. The handguard doesn’t touch the barrel at any point, allowing it to vibrate consistently with each shot. Additionally, modern free float rails provide more attachment points for accessories like lights, lasers, and grips without affecting barrel harmonics.
The installation process requires removing your existing handguard system, whether that’s a standard delta ring setup or another free float rail. While the job demands some specialized tools, most builders can complete it in 30 to 60 minutes with proper preparation.
What Tools Are Needed to Install a Free Float Handguard?
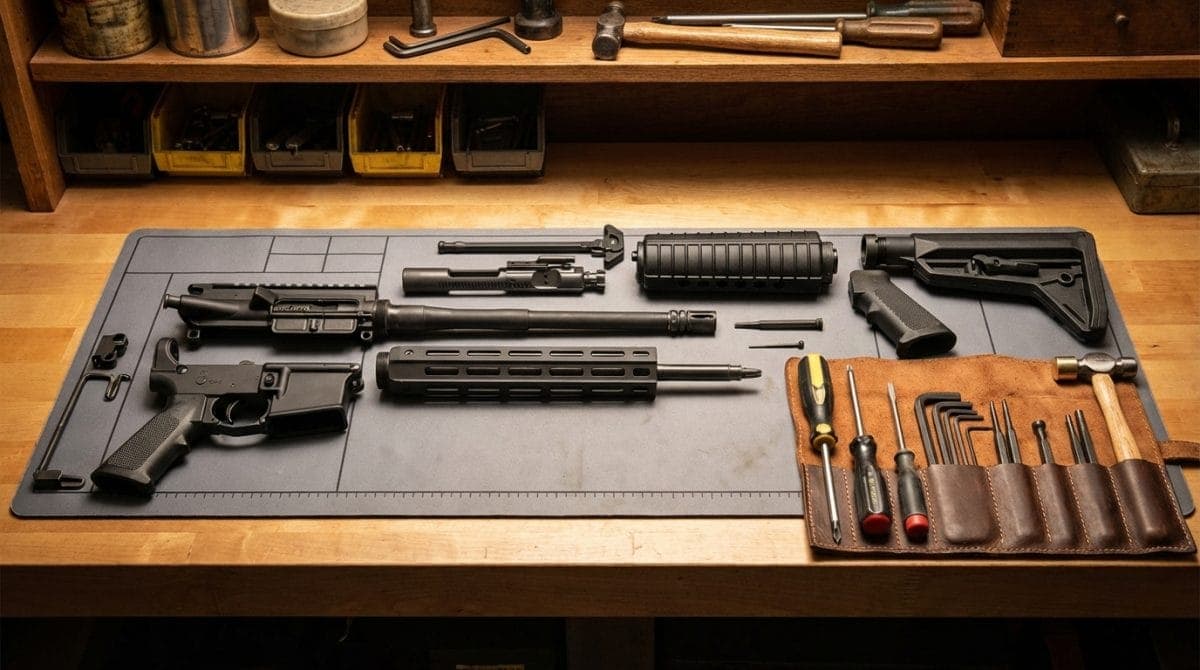
Before starting your handguard installation, gather these essential tools:
- AR-15 armorer’s wrench: For removing and installing the barrel nut (typically $25-45)
- Vise with AR-15 vise block: Secures your upper receiver without damage
- Torque wrench: Critical for proper barrel nut installation (30-80 ft-lbs range needed)
- Pin punch set: 3/32″ punch for gas tube roll pin removal
- Hammer: Brass or polymer face prevents marring
- Allen key set: Most handguards use 2.5mm to 5mm set screws
- Anti-seize compound: For barrel nut threads
- Blue Loctite: For handguard mounting screws
Parts List with AR15 Outfitters Links
Here’s what you’ll need for a complete free float handguard installation:
- Free float handguard kit (includes barrel nut and mounting hardware)
- Low profile gas block (if replacing front sight post)
- Gas tube (match to your barrel length: carbine, mid-length, or rifle)
- Gas tube roll pin
- Crush washer (if removing muzzle device)
Step-by-Step Installation Process
Step 1: Prepare Your Upper Receiver
Clear your rifle and verify it’s unloaded. Remove the upper receiver from the lower. If you have a complete upper, remove the bolt carrier group and charging handle. This prevents damage during the installation process.
Secure the upper receiver in your vise block. The block should clamp around the receiver without touching the barrel. Tighten the vise firmly; the upper shouldn’t move when applying torque to the barrel nut.
Step 2: Remove Existing Components
Start by removing your muzzle device if necessary. Most flash hiders and muzzle brakes tighten clockwise (right-hand thread). Use your armorer’s wrench to turn counterclockwise. If it’s stubborn, apply penetrating oil and let it soak for 10 minutes.
For delta ring handguards: Pull the delta ring toward the upper receiver and lift out the handguard halves. Use your armorer’s wrench to unscrew the delta ring assembly and barrel nut underneath.
For existing free float rails: Remove any set screws or clamping mechanisms specific to your handguard model, then unscrew the barrel nut.
Step 3: Remove Front Sight and Gas Tube
If you have a front sight post gas block, drive out the two taper pins using a 3/16″ punch. These pins are tapered, so they only come out from one direction: typically from left to right as you look down the barrel from the rear.
Once the front sight is loose, use a 3/32″ punch to drive out the gas tube roll pin. This small pin secures the gas tube to the gas block. Support the gas block while punching to prevent bending the gas tube. Pull the gas tube free from the gas block.
Step 4: Install New Gas Block
Slide your low profile gas block onto the barrel, aligning the gas port on the barrel with the gas block’s port. For most carbine-length systems, the gas block sits 7 inches from the upper receiver face. Mid-length systems measure 9 inches, while rifle-length systems are 12 inches.
Insert the gas tube through the upper receiver and into the gas block. The roll pin hole should align perfectly when properly seated. Drive in a new gas tube roll pin, ensuring it’s centered in the gas block.
Tighten the gas block set screws to 30 inch-pounds if using a clamp-style block. For set screw models, apply a drop of blue Loctite to each screw and torque to 35-40 inch-pounds.
Step 5: Install New Barrel Nut
Apply a thin layer of anti-seize compound to the upper receiver threads. This prevents galling and ensures consistent torque readings. Thread the new barrel nut onto the receiver by hand until it stops.
Using your torque wrench and armorer’s wrench, tighten the barrel nut to 30 ft-lbs. Loosen it completely, then torque again to 30 ft-lbs. This seasoning process ensures proper thread engagement. On the third time, torque between 30-80 ft-lbs, stopping when a gas tube hole aligns with the gas tube. In most cases, proper alignment occurs between 40-60 ft-lbs.
Step 6: Mount the Free Float Handguard
Slide the handguard over the barrel and gas block. Most designs use one of three attachment methods:
- Clamping style: Tighten mounting bolts evenly to manufacturer specifications (typically 35-55 inch-pounds)
- Set screw style: Apply blue Loctite and tighten screws in a cross pattern to 20-30 inch-pounds
- Proprietary mounting: Follow manufacturer instructions for their specific system
Verify the handguard doesn’t contact the gas block. You should have at least 0.030″ clearance all around. Check alignment by looking down the top rail; it should be perfectly parallel with the upper receiver rail.
Step 7: Reinstall Muzzle Device
Thread your muzzle device onto the barrel with a new crush washer. The washer should compress as you tighten, timing the muzzle device correctly. Most devices require 20-30 ft-lbs of torque. For precision builds, shim kits offer more consistent alignment than crush washers.
Common Mistakes to Avoid
Several errors can derail your handguard installation:
- Over-torquing the barrel nut: Exceeding 80 ft-lbs can damage receiver threads
- Misaligning the gas tube: A kinked tube causes cycling issues
- Forgetting anti-seize: Dry threads lead to inconsistent torque and potential galling
- Incorrect gas block position: Measure twice before tightening set screws
- Handguard touching gas block: Creates accuracy-robbing contact points
Torque Specifications Summary
| Component | Torque Specification |
|---|---|
| Barrel nut | 30-80 ft-lbs |
| Gas block set screws | 35-40 inch-lbs |
| Gas block clamp bolts | 30 inch-lbs |
| Handguard mounting screws | 20-55 inch-lbs (check manufacturer) |
| Muzzle device | 20-30 ft-lbs |
Build This on AR15 Outfitters
Ready to configure your own free float handguard setup? Visit AR15 Outfitters’ AR-15 Builder to compare prices across multiple retailers and ensure compatibility between components. The builder automatically checks gas system lengths, barrel profiles, and handguard inner diameters to prevent ordering mismatched parts.
Start with your upper receiver selection, add your barrel, then browse compatible free float handguards. The system shows real-time pricing from trusted retailers, helping you find the best deals on quality components. Most builders save 15-30% compared to buying parts individually without price comparison.
Whether you’re upgrading an existing AR or building from scratch, proper handguard installation improves both accuracy and functionality. Take your time, use the correct tools, and follow torque specifications for a professional-quality result that enhances your rifle’s performance.
Disclaimer: AR15 Outfitters does not sell firearms. This site is an information and affiliate resource only. All purchases are completed through licensed retailers. Always comply with all federal, state, and local laws when building or purchasing firearms and firearm components.